Showing posts with label Audrey Pettit. Show all posts

Sep 6, 2012

LESSology Challenge #18: Creative inspiration from Amy Tsuruta, Shahrul Niza, Audrey Pettit and Mandy Dodd


Photobucket

Are you enjoying the gift-wrapping ideas so far for LESSology Challenge #18: It's a Wrap! ....and working hard on your own projects? Today we get to see even more amazing projects from design team members Amy Tsuruta and Shahrul Niza. And to sweeten the deal, we also have projects from alumni team members Audrey Pettit and Mandy Dodd! :)


Hi All....Amy T here to share my It's a wrap project!

I'm a huge fan of altering tins...combine them with an upcycled Starbucks coffee sleeve and they make wonderful packaging for a gift:


The sleeve, deconstructed, makes for a perfect 'belly band' on the hinged tin:


The exposed corrugated cardboard is a wonderful starting point for any type of embellie!

I loaded it up with Basic Grey's Paper Cottage Collection!


Do you see the inner wrap?  It is actually an upcycled department store bag from Japan!  My mom gave it to me with something she was returning to me...she had it in her stash which came over to my stash:)


Peel back the inner wrap and  BAM....Tea for Two!


I can't wait to see how you're inspired by LESSology Challenge #18: It's a wrap!



Photobucket

Hello all,
Who wouldn't be excited about making gift boxes and prettying up packages?. Thrilled to come up with some unique gift wrapping ideas, I've been busy searching for old containers to be used for this month's up-cycling project!. Armed with some of my favorite fabric yoyos and paint, I started working :). Here is what I made...


Basically, I primed the round box with black gesso before painting it all with white acrylic paint. Sanded the edges to give it a worn-look. Then I glued on some pretty fabric yoyos around the box and later tied them up with waxed string. The fabric yoyos are practically my 3D gift wrapper!. Lastly, I secured a large silk rose with a brad onto the lid.


This little banner of fabric yoyos tied up with string simply makes me smile.

A silk rose on top. 

Inspiration behind this project is actually those pretty fabric yoyos themselves!. I have always kept them in my stash for a quick embellishment on mini albums. Every now and then, I would make some whenever I found beautiful fabrics. And now, they give a unique 'homemade' feel to my gift wrapping project :). 

Can't wait to see all the creative goodness from you next. Have fun wrapping!

Audrey Pettit 

My daughter recently made a small electronics purchase that came with a nice, sturdy box just perfect for gift giving. 


Although the box had printing on it from the manufacturer, I knew I could cover that with a few coats of gesso. Then it was quick work to add a strip of box-pleated patterned paper trimmed with paper doily to the top and tie it all up with a piece of satin ribbon I had saved from a previous gift box. 


I added a snowflake topper to the bow made from layered die cuts and strips of recycled corrugated cardboard. The topper is super easy to put together, and makes a great removable ornament that your gift recipient can enjoy for years to come.


To make the snowflake, simply cut 4 strips of recycled cardboard to your desired size. My strips are approximately 1/4" x 5", but you can change the size up to make larger or smaller ornaments. Lay the strips in crosses and staple the center to hold all the pieces together. Paint the ornament, if desired, and add touches of crystal clear glitter to each arm. Layer die cuts together using foam adhesive between each layer. Top with a button tied with twine and add the die cuts to the center of the ornament. Add a cardstock sticker banner and tie the ornament to the center of your bow.
Enjoy!

  Mandy Dodd


Do you love tissue paper for wrapping gifts?  I LOVE it, and whatsmore, I’ll recycle it.  (Nothing a hot iron can’t un-crease!) I also LOVE confetti – there’s something about the ‘joy’ it represents!   Confetti almost always accompanies a celebration oozing much happiness.

So thinking, thinking, thinking – how can we work the two together!


Make some confetti with the hole-punch in colours you love, and make the confetti out of the scraps we all have in a box or folder somewhere!

Out with the sewing machine…. 


Fold a full piece of tissue paper together and using zigzag stitch, sew around the edges.  It’s quite striking. Leave a little gap as this is where you will pour the newly made confetti through, then sew the gap up and also sew down the side where the fold is to give it a ‘finished’ look.


Shake the confetti around inside the enclosed tissue paper so it evens out….


Finish off with a little gift card printed from a piece of Lino from an art shop – carved into a line of little Christmas trees. (tutorial for this shown here). 

Ooooh...don't you just love how different and awesome each of these projects are? We would love to see your version of gift-wrapping! Come join us for LESSology Challenge #18: It's a Wrap! :)

Please leave a little love for these lovely talented ladies! 

P/s: Come back tomorrow for another round of creative inspiration - this time from our guest designers....and a special giveaway! :)

Feb 14, 2012

A special tribute to design team member Audrey Pettit!


Audrey Pettit

Hello altered enthusiasts! Happy Valentine's Day to you!:) Here at LESSology, we want to pay a special tribute to design team member Audrey Pettit, who is stepping down to spend more time with her family. Audrey's work has been nothing short of extraordinary and though we will miss her, we are proud to have had her on our team.


Here's a slideshow of Audrey's creative projects for LESSology. Please leave a little love for Audrey.

P/s: Don't forget to play along with our current challenge - LESSology Challenge #11: Flights of Fantasy! It ends on Sunday March 4, 11.59pm EST. Please read the challenge rules to ensure your eligibility for our prizes

Feb 7, 2012

LESSology Challenge #11: Creative Inspiration from Audrey Pettit, Kirsty Vittetoe, Laurel Seabrook, Linda Lapotka and Yvonne Yam


Photobucket

Curious to see how the team interpreted LESSology Challenge #11: Flights of Fantasy?

Audrey Pettit

Hi everyone, it's Audrey, here sharing my project for our new challenge, Flights of Fantasy.


I absolutely adore our challenge theme this time around! So many possibilities! I mean, is there any end of cute bird products on the market these days? For my project, I made a card with this adorable owl die that I fell in love with at first sight and couldn't wait to use. What a perfect opportunity to try something new.


I die cut the owl from several different patterned papers so I could mix and match the parts to create my own design. I used foam adhesive on some of my layers to give depth and dimension to the little guy, and centered him in an ornate frame that was die cut from kraft cardstock. A little bit of white paint around the edges gives an instant sense of age to the design.

Added a hand-stamped sentiment banner and a layered pom-pom, seam binding bow, and perched my owl on a twig, my up-cycled goody for today. I do love to incorporate a bit of nature into my projects. :)

Kirsty Vittetoe


My daughter is a music major at Calarts, she is preparing her solo recital and I know she will love this.....

Flight of the Bumblebee by Nikolai Rimsky Korsakov, one of her all time favorite


I intend to put a little gift in there just for her...


this project started with a little favor box I got from a wedding dinner party


it is old and torn so it needs a little make-over


old book pages, stamps, glimmer mist, tissue paper tape, and the new look!!!!


now Pixie is ready to take her flight........


flight of the bumblebee, which is.......


Laurel Seabrook


Hi Laurel here.  When I saw this challenge I immediately thought of some of my old maps that I was given and decided to make a travel themed mini journal.  I altered a chipboard album and made a little travel journal for jotting down some quick, short notes on the day's adventures, making it easier to scrap the photos when we get back.  Some of the journal spots are adhered on three sides only, so as to make a pocket for receipts and tickets.  I stamped a tag on one of my maps to use as an embellishment on the album cover.


Now a couple of photos of some of the inside pages:


Now to go on a trip!

Linda Lapotka


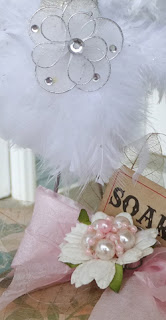
We have a fun challenge called Flights of Fantasy. I took the flight part seriously and made this whimsical bird.


I formed the bird with two cells from an egg carton.  Then I painted it white.


The legs are the metal things you tie your turkey together with to keep the stuffing from falling out. 


For the base I covered a box with DP from CTMH and poked the legs into that. Then I covered the bird with feathers. Next I added a flower to the front of the bird, and the base. The base flower is a daisy that I added a homemade embellishment to the center. 


The last thing I added was a Tim Holtz ticket tags that says SOAR. This was so much fun. Feathers were flying everywhere. LOL This whimsical bird will remind me to SOAR with my ideas.

You can see how I created this in a video at my blog.

I hope you will join the challenge. We look forward to seeing your Flights of Fantasy.


Yvonne Yam

Hello friends! It's Yvonne here to share my inspiration for LESSology Challenge #11: Flights of Fantasy.

Flights of fantasy

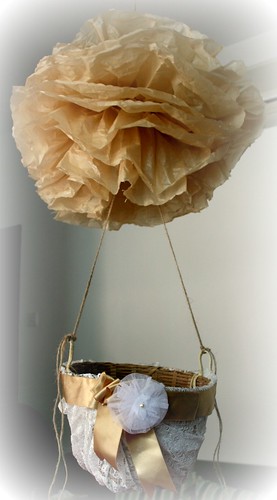
My project is a combination of my fascination with hot air balloons and my recent love for making tissue paper pom poms.


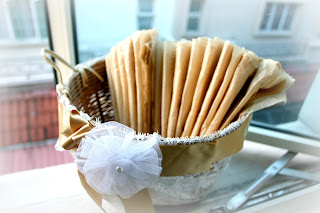
This little basket used to house some delicious lychees. The lace and ribbon were from an ugly bridemaid's dress.


I love that I could put candy in the basket at a party and keep it neatly away for use on another occasion.


All I need to do is fluff up those pom poms! :)
Has the design team inspired you to give LESSology Challenge #11: Flights of Fantasy a try? You are free to interpret the challenge in any way you want as long as you include at least one upcycled item.We would love to see your entries! :)